1977 FORD
|
Client Project |
Frame-Off Rotisserie Restoration |
|
|
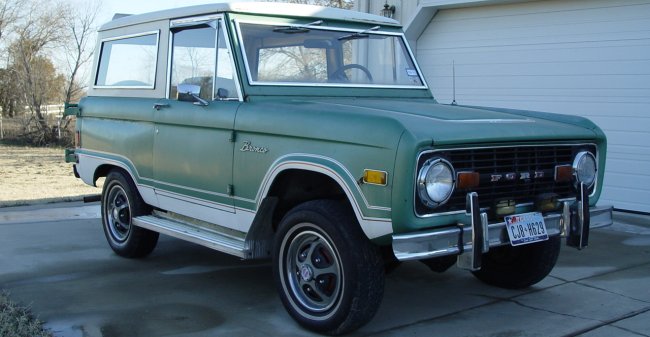
"Swamp Thing" comes to us by way of its new owner in Austin, TX. A local friend of his happened to see Project Buckshot mounted on our rotisserie out in front of the shop one day, and when his buddy picked up this Bronco, he referred him to us.
Unlike Buckshot, This Bronco is here for a full frame-off rotisserie restoration. And, although it was bought in running/driving condition, it definitely is in need of a full restoration. At first glance, the body looks reasonably straight - at least from 20+ feet away. Upon closer approach, it becomes clear in a hurry that there are some serious rust issues brewing under that green and white paint.
The interior looks to be in relatively good condition, but - again - under closer inspection, it became quite clear that the swiss-cheese hardtop had provided moisture with a point of entry and once the interior got wet, mold and mildew took over. In fact, when it arrived on the trailer, water was draining out of the floorboards onto the trailer.
Why "Swamp Thing"? Well, until the client provides us with a name, we've got to call it something. And, with three Bronco's in the shop at the same time, "1977 Bronco" becomes kind of tedious. So, since it's green and smells of "Ode De Bayou", "Swamp Thing" seems apropos.
The owner is an active Texas A&M alumni, and is working on involving the student body in the project. Where that will lead, we can only guess at this point.
|
AS RECEIVED | ||||||
|
Despite the visible rust issues and mildew smell, "Swamp Thing" ran and was driveable when we first saw it. What lies beneath the surface remains to be seen.
|
||||||
|
|
||||||
|
|
||||||
DISASSEMBLY | ||||||
|
The first task in most every full restoration is disassembly - especially when you're planning to do a frame-off.
Disassembly started with removing the seats so that we could gain better access to the interior while removing all the fasteners securing the hardtop. But prior to removing the hardtop, careful measurements were taken for use when fabricating a roll cage (see below)
With the top removed and the seats out, quick work was made of the remainder of the interior. While the carpet and side panels had appeared to be in good condition, upon removal it was obvious that moisture had taken its toll on the soft goods of the truck. With the carpet and side panels removed, we were better able to inspect for rust damage. Surprisingly, the main floor behind the front floorpans seems to be in reasonable condition. We had already assumed that the front floorpans were shot, but were still surprised at the "repair" someone did at one point by using duct tape to hold down a sheetmetal "patch" and then painting it black. We also discovered a good deal of rust-through inside the rear quarter panels in the junction between the upper and lower sections. One nice thing about having the top off and the interior removed is that it started to smell a bit better.
Next the doors and front clip were removed. This provided us with a view of even more rust damage. Just as we had suspected, the inner fender wells had the same rust damage that we first encountered on Project Buckshot, and then again on Big Red. In fact, on all three Broncos, we found rust-related problems in the front inner fenders, A-pillars, floorpans and vent window pivots. These will certainly be key inspection points on any future Bronco projects.
In order to gain full access to every inch of the body, after we remove it from the frame, we will mount it on our rotisserie. With early Broncos, doing a frame-off restoration poses certain challenges if you're planning to mount the body to a rotisserie because the body itself has no true structural integrity. Even just lifting the body off of the frame (using our two-post lift) leaves the body subject to collapsing in on itself unless we provide it with some sort of structural support. With Project Buckshot, we had the luxury of a full 8-point roll cage that had already been fabricated for that Bronco. So, the question was posed to Swamp Thing's owner: "Fabricate a temporary & disposable support structure to facilitate mounting it on a rotisserie, or build a custom roll cage that can be utilized as part of the final build?" The answer was an emphatic "yes" to a roll cage. So, Rick Webster from 4X4Review Offroad Magazine came out and built a cage for Swamp Thing that is very similar to the one he built for Project Buckshot. Once we get it bolted down, we'll be ready to pull the body off the frame.
|
||||||
|
|
||||||
|
With the disassembly complete and the roll cage installed to provide structural support for the body, removing the body from the frame became an easy task.
|
||||||
|
||||||
|
|
||||||
ROTISSERIE | ||||||
|
With the body off the frame, mounting it to our rotisserie didn't take long - especially since the last vehicle that was mounted to the rotisserie was Project Buckshot and all the mounting points were exactly where we had left them. Once on the rotisserie, we were able to get a good look at the overall condition of the body, but we'll get an even better look once we've sodablasted the body down to bare metal.
|
||||||
|
|
||||||
|
|
||||||
SODABLASTING | ||||||
|
Having the body mounted to the rotisserie makes is so much easier to sodablast it down to bare metal. We're able to rotate it at will and get to every nook and cranny without having to do any gymnastics or play contortionist. Still, while the outer body panels present a fairly easy target, once you start blasting inside an interior or into wheel wells and engine compartments, the blow-back of soda makes for a big visibility problem.
After about 8 hours of blasting, the entire body shell was down to bare metal. The hood, doors, front fenders and tailgate still remain to be blasted, but we'll wait until we're closer to getting everything into primer before we blast them. With the body now free of all paint, body filler, undercoating and road grime, it's easy to see all the areas where rust has taken hold. There's some serious damage to be sure. But, with body panels for the Bronco being so readily available, there's little doubt that we can make it whole once again. While it might have been nice to purchase a Dynacorn replacement body, they're not yet out of R&D and we're not likely to see them available until late fall at the earliest.
Have a look at the videos of the sodablasting and you'll see just how effective this process can be.
|
||||||
|
|
||||||
|
|
||||||
DRIVE TRAIN | ||||||
|
The nice thing about doing a frame-off restoration of a Bronco is that you can pull the body off without removing the engine and transmission. That means that once you do remove the body, you have full access to everything - greatly simplifying the removal of the engine and transmission. At this point, no determination has been made as to what will be done with the engine, transmission and axles. However, it is most likely that the engine will either be rebuilt or replaced with a crate engine. The transmission may be rebuilt, but since the overall condition of Swamp Thing left us feeling uncomfortable taking it out on the road for a test drive, its condition is uncertain. As for the axles, both will need to be gone through - especially since the rear axle seems to be making some serious noise in the differential whenever we push it while turning.
|
||||||
|
|
||||||
|
|
||||||
FRAME | ||||||
|
Despite being covered with some serious layers of grease, grime and surface rust, the frame appears to be in decent condition. Sure, it's going to need to spend some time at the business end of a media blaster, but it doesn't appear to have rusted through anywhere and should be structurally sound. Of course, we won't know for sure until we blast it clean - which won't be until after we build the new body (see below).
|
||||||
|
|
||||||
|
|
||||||
BODYWORK | ||||||
|
The greatest challenge facing us with Swamp Thing is the condition of the body. While it looked to be in reasonable shape while still wearing its green and white paint scheme, once we blasted through the paint and body filler, we discovered we had a real job on our hands. In fact, we're hard-pressed to find even a single body panel that hasn't been rusted-through. And, we're not just talking about the outer body panels, every piece of metal in the body tub assembly has been holed through in at least one place. Only some of the structural crossmembers seem to have held up.
So, what do we do?
Well, Dynacorn is working on a replacement steel body shell for the 1966-1977 Broncos. As of early 2011, they claimed that the new body would be out of R&D by late spring of 2011 - and then the first 3 shells would go to Ford for evaluation and approval. Even if they're able to hold to that schedule and if we were somehow able to purchase their very first production shell (unlikely as they were very noncomittal), we'd be looking at late 2011 - at the earliest - before we could get our hands on a replacement shell.
Then there's the "Unassembled Body Tub Kit" from Jeff's Bronco Graveyard. They claim that the kit includes "all the pieces to make a full steel body tub".
Given that it could easily be a year or more before Dynacorn's replacement body is available for purchase, after lengthy discussions with Swamp Thing's owner, we opted for the body tub kit. The plan is to first mock-up the body kit on the frame (using new body mounts) using sheetmetal screws to hold everything together and see just how well everything lines up. We have diagrams with most (if not all) the key meausurements and we always have the original body tub still sitting on our rotisserie for reference. If everything lines up well, then we'll start welding the new body tub together. If the kit's pieces don't go together as well as we hope, then we'll look at replacing nearly everything on the original body in a step-by-step fashion. But, assembling a new body "should" take far less time than cutting and patching the original body. So, we're very hopeful that we'll be able to build a completely new body tub from this kit - giving Swamp Thing a fresh start.
|
||||||
|
|
||||||
|
|
||||||
BODY KIT ASSEMBLY | ||||||
|
We may have driven off the deep end, but we don't think we've bitten off more than we can chew. Granted, assembling a Bronco body from a kit is a major undertaking. But, we love a good challenge and at least one of us played with jigsaw puzzles as a kid, so I think we meet the prerequisites. We have the technology. We possess the skills, and we have the ambition. We've also received funding from Swamp Thing's owner to begin construction of the new body, so we're kind of committed - or perhaps should be.
Getting everything to fit and align properly was the greatest challenge. With the frame leveled, we had a solid refrence point. In order to keep us from forging ahead blindly, we first mocked-up the entire body using self-tapping sheetmetal screws. Once we got it assembled and square, we mounted the replacement hardtop our client had purchased to ensure we had everything aligned.
|
||||||
|
|
||||||
|
The build process for Swamp Thing's body kit is depticted below in timelapse. After the initial mockup was completed, it was decided that new doors and front fenders were in order, so you'll see them added at the end of the animation just prior to mounting the hardtop for verification of alignment.
|
||||||
 |
||||||
|
After completing the mockup and verifying alignment using the hardtop and mounting the doors, fenders, etc., it was time to finalize the assembly. We did this by first welding together sections of the body assembly as subassemblies prior to removing them from the frame. In this way, we were able to ensure that all the parts remained in alignment during the welding process. But we were still able to disassemble everything so that we could get to the core of the body tub assembly - the floor subassembly.
As you'll see in the slideshow, we first welded the front clip support assembly together and removed it from the frame. Next, the firewall assembly was welded together and removed. That left the two rear quarter panels (with the lower outer panels and corners to be welded during final assembly), followed by the rear floor pan (which got stiffeners after being removed) and finally the front floorpan subassembly.
Once all the subassemblies were ready, they were reassembled on the frame and welded together after quite a bit of final trimming and alignment.
|
||||||
|
One of the shortcomings of the body tub kit was that the body mount points for the midsection of the floorpan (just behind the front seats) did not include a recess for the body mount bolts. So, we cut a pair of holes in the upper pan and then welded in a section of 2" exhaust pipe to bridge the gap between the floorpan and the support brace underneath.
Being a '77 model, Swamp Thing came equipped with gas filler cap doors. Since this was the only year that came with these doors, nobody makes a reproduction quarter panel with the door openings. So we had to graft in a pair of recessed door openings into the new panel. One of the openings in the original tub was rusted out, but we were fortunate enough to be able to have Bronco Hut cut the required section out of the quarter panel of one of their parts Broncos. The openings were lipped for a solid fit, then spot welded and then leaded to a smooth finish that will require only a minor amount of body filler.
The slideshow below also shows just how badly one of the Chinese rocker panels fit - and the one shown was actually the better of the two.
We also discovered that none of the tub kit parts (aside from the A & B pillars) included any of the caged nuts. So, we had to salvage what we could from the old body and fabricate what we couldn't. Mostly, these were all the mounting points for the tailgate and hardtop fasteners at the rear of the vehicle. But, we're also going to have to add some for seat mounts, seat belts and a few in the firewall.
|
||||||
|
Aside from a moderate amount of trimming and some cutting/bending, the body tub kit went together quite well. The only pieces that gave us fits were the rocker panels. The ones included in the body tub kit are made in China and we just couldn't seem to get them to fit correctly. They left uneven gaps at the bottoms of the doors that ranged from 3/8" at one end to nearly 7/8" at the other end. Fortunately, Jeff's Bronco Graveyard also carries rocker panels made from Ford's OEM tooling. They were almost a perfect fit. Not only did they give us a good gap at the bottom of the doors, they also allowed us to shorten the distance between the A & B pillars - which narrowed the front and rear door gaps.
The final result is one very well built Bronco body with nice door gaps (~3/16" all around) and even tailgate gaps (< 1/4"). Even the reproduction front fenders fit well (after some minor modification) and mate up nicely to the original front grill.
Altogether, when Swamp Thing is finished, the only original steel in the body will be the grill, hood, tailgate & hardtop. To our knowledge, nobody else has successfully completed one of these body tub kits. Would we do it all again? Sure!
When Rick Webster from 4X4Review Offroad Magazine originally built the roll cage for Swamp Thing, we knew that we'd wind up having to modify it a bit to account for the repairs we knew we'd have to do to the body tub. But, when we set it back in the new tub assembly, we were amazed at just how much adjusting we're going to have to do. It's a sure sign of just how far off the original body was. Rick promised to come back and make the final tweaks when we're done, so he'll be getting a call. Besides, we still owe him some final trim paint work on Project Buckshot.
All we're waiting on now is a visit from Swamp Thing's owner so that he can inspect our work and give us approval to move forward.
|
||||||
|
|
||||||