
| Home | Current Inventory | Projects | Services | Company | Stuff | Bob's Car Collection | Contact Us |
|
on Facebook |
"Full Inventory" (Projects, Completions and Personal Collection) |
 77 Lancia Scorpion |
 67 Camaro RS Conv. |
|
68 Austin Healey Sprite |
 68 Cougar |
 69 Corvette |
 70 Opel GT |
 69 Marcos 3000GT |
 86 TVR 280i |
 73 TVR 2500M |
 90 Buick Reatta |
1971 FORD
|
Client Project |
"Frame-Off" Restoration |
 |
When the owner of Big Red came by to pick up the Bronco that we had finished for him, he brought - and dropped off - this 1971 Ford F-100 pickup truck that had been in his family for years. We were tasked with restoring it - with the idea that we aren't building a show truck or anything particularly special. Basically, a "20-footer" restoration on a reasonable budget.
|
 |
As often happens, midway through the project, the client decided to alter the specifications of the project - both in scope and implied quality level.
First, we were asked to enhance the exterior appearance by adding the chrome and stainless steel pieces that were included in the Ranger trim package offered by Ford at the time. This included full-length side trim pieces (3 5/8" wide) and a full set of rocker panel trim. Also included is the chrome trim wrapping around the rear of the cab and chrome trim around the windshield and rear window. Aside from the large "F O R D" panel on the back of the tailgate, none of the other tailgate trim pieces were added due to their excessive cost.
Second, the client decided to opt for a two-tone red-over-white paint scheme using the original colors for 1971 ("Rangoon Red" and "Wimbledon White"). The change in color demanded that the interior be stripped and repainted in red to match the exterior scheme. Also, given the addition of all the chrome and the color change, an "implied upgrade" in overall appearance quality was in order. Since red is much less forgiving of minor imperfections in bodywork than white, the overall quality level of the bodywork had to be improved so that the final paint work would live up to what you'd expect with all the new trim. Still, the final goal was not quite show-level, but more like a "5-footer" (i.e.: how close you need to get before seeing flaws).
Of course, none of the changes were beyond our abilities, but changing course midway through a project does lead to some backtracking and loss of efficiencies. That leads to what is often the greatest challenge in these cases - keeping costs under control while still meeting the revised expectations.
|
BEFORE | ||
|
What we received was actually a pretty-much straight basic F-100 "Custom". Aside from a minor crunch at the bottom of the left rear quarter panel, there weren't any serious body damage or previous repairs visible. The front bumper was an obvious replacement item. But, aside from that, the exterior appeared to just need a good stripping and repaint.
Inside, the interior was actually in decent shape. The dash was split and would eventually be capped by an ABS cover. The seat cover hadn't split yet, but it was on the verge. There was no carpet - just rubber mat - so it was easy to see that the floor pans (at least the driver's side) would require replacement. It appeared to have come equipped with either factory or dealer-installed A/C. Other than than, there just wasn't much to the interior of one of these trucks.
The engine and transmission had already been removed prior to our client taking possession. He had already taken them to an engine shop for a rebuild. But, we were expected to do the final installation so we could present him with a complete package when we were finished.
|
||
|
|
||
DISASSEMBLY | ||
|
The nice thing about classic pickup trucks is that there isn't much to them - especially when you're working with a basic no-frills model. Fortunately, this truck stayed dry most of its life, so disassembly was relatively easy. Aside from the bed mounting bolts, we didn't have much trouble removing components. After removing some parts - such as the front bumper and right front marker on the hood, we were able to see some additional damage that wasn't apparent before. But, nothing serious was found - just a greater number of minor repairs, so we were still in good shape.
|
||
|
|
||
SODABLASTING | ||
|
You never really know what you've got until you remove all the paint and other stuff that has accumulated over the years. While we did find a number of small body-filler repairs that were done at the factory, the only real surprises were a small rust-through spot at the bottom front of the driver's door and some significant damage to the top of the hood. We repaired the rusth-through in the door with a sheetmetal patch. The damage to the hood was remedied with body solder ("leading"). We already knew the floor pan was rotted through, but no additional rust problems were found. The body damage to the left rear tail light area wound up being a bit more extensive than originally anticipated - requiring a patch panel for the fender area in addition to a replacement section for the tail light housing.
|
||
|
|
||
FRAME & RUNNING GEAR | ||
|
After first replacing the king pins and bushings up front, we replaced the radius arm bushings and the brake components at all four corners - including new drums in the rear. Since we had the cab and bed off of the body, it only made sense to properly clean and finish the frame. So, the entire frame was treated to a few cans of Gunk degreaser - followed by a long session at the business end of a pressure washer. Once clean, it was treated with POR-15's Metal Ready to neutralize the surface rust and prep the metal to accept its final coating. Once ready, we sprayed on a couple coats of POR-15 rust-inhibitive black coating so that rust will never again be an issue.
|
||
|
|
||
BODYWORK | ||
|
Sodablasting revealed a lot of small repair areas that - aside from the hood and one around the fuel filler - appear to have been done at the factory. Some of the previous repairs on the hood were actually pretty significant and may have resulted from whatever abuse damaged the front bumper and grill. The truck bed was removed and stripped weeks before the cab, so we immediately shot it with a coat of etching primer to hold rust at bay while we performed some of the intitial bodywork on it. Several additional dents and dings also required repair. Where appropriate, such repairs are done by working the metal back (as closely as possible) to the original shape. Final shaping is performed using thin layers of premium body filler and glazing compound. The rust hole in the door gets a small sheetmetal patch welded in place. The left rear corner of the bed received two patch panels - on at the bottom rear of the fender and the other to replace the lower section of the tail light housing. The damage to the hood was repaired using lead filler.
The tailgate was easily the most heavily damaged component - as would be expected with a work truck. Given the depth of a few of the dents and their location (right at the top), we elected to use lead to fill these areas.
Everything - the cab, bed, front clip and interior - received a coat of etch primer before bodywork started. Following the initial bodywork, the exterior received 3-4 coats of high-build primer and was left to cure for several weeks before block sanding. The front clip's inner fender wells and core support were stripped (via sodablasting), metal prepped to stop any remaining rust (minimal) and then coated with POR-15's rust inhibiting coating.
|
||
|
|
||
INTERIOR | ||
|
After we sodablasted the exterior of the truck, the client opted for a two-tone paint job - which necessitated a change in the interior color from white to red. So, we broke out the sodablaster once again and went to town inside the cab. Aside from making for a much cleaner slate for painting the interior, going back over the windshield and back window frames with the glass removed made for a much cleaner gasket surface under the paint job we'll be laying down. After sodablasting, a coat of etch primer was sprayed inside and then overlayed with a sealer primer.
The entire interior (excepting the center section of the floor) was treated to the same Rangoon Red PPG base and clear coats used on the exterior. The original firewall insulation fell apart during disassembly, so a new one with an ABS shell was installed. The original steering column was disassembled for reinstallation to eliminate the need to cut a slot in the new firewall pad. While disassembled, we discovered that the turn signal switch was broken and that the shift linkage mechanism had been incorrectly assembled at one point. So, we took the opportunity to make things right and paint the column assembly black to match the new interior. A new steering wheel and horn pad round out the column restoration.
Reproduction upholstery for the original green interior does not seem to be available. So, the client opted for basic black. No upgrades are planned for the interior.
|
||
|
|
||
DRIVETRAIN | ||
|
The engine and transmission had already been removed from the truck before it arrived for restoration. The client removed them for rebuilding by another shop. What you see in the initial photos is how the engine looked when it was delivered midway through the project. The rebuild shop had already installed an Edelbrock aluminum intake manifold (we're a bit concerned about the excess RTV used) and painted everything but the intake in Ford blue. The engine left the factory as a 360 ci FE block, but it's now been bored out to 390 ci. No other modifications are reported to have been done.
We had expected to receive a completed engine and transmission - with all the accessories mounted and ready to drop in with not much more required of us other than to maybe bolt the engine and tranny together before slipping them into the chassis. But, getting it this way means that we can prep, refinish and assemble all the externals the way we like. It just took us a bit longer since we had to clean and refinish everything ourselves and then sort through unmarked bags of brackets and fasteners. We've done enough work with Ford FE blocks in the past, so whatever we didn't recall offhand was easily be found in our photodocumentation library from past projects.
Aside from upgrading to a Pertronix electronic ignition, headers and a new Edelbrock 4-barrell carburetor, no other modifications were done to the engine. Of course, the headers required fabrication of a new dual exhaust system with Magnaflow headers.
|
||
|
|
||
INITIAL ASSEMBLY | ||
|
The order of reassembly seems to vary from one project to another. Sometimes we paint all the body components separately and then reassemble all the painted body pieces. Other times, we reassemble nearly everything and then paint the body as a single unit. In this case, since the doors fit so well, we opted to not remove them for this restoration. The color change demanded that we jamb the fenders and hood separately with the two-tone scheme laid out on the front and back edges of the fenders. Painting door jambs with the doors mounted can be a bit of a challenge, but that's where an airbrush comes in handy. In the long run, not disturbing such well fitting doors gives us a leg up on reassembling and aligning the front clip.
The inner fender wells and radiator core support had been painted as an assembled unit early on, so the front clip went together pretty quickly. Final alignment will be saved for after paint is applied. Unfortunately, the bed and tailgate can't be mounted until after paint. Fortunately, our paint booth is large enough to accomodate everything at once - which helps to ensure that we have a consistent finish over the entire body.
|
||
|
|
||
PAINT | ||
|
Following the bodywork, it was time to apply the final color and finish. Midway through the project, the client opted for a color change from the original basic white to a period-correct two-tone scheme using "Rangoon Red" over "Wimbledon White". To ensure a quality finish, we used PPG's Deltron 2000 paint system. Three coats of DBC color base coats were overlaid with three coats of DCU2042 urethane clear.
After giving the clearcoat a few days to cure, we commenced with colorsanding to remove nearly all traces of orange peel and other imperfections. The color sanding was done by hand - wet-sanding using 4 progressively finer grades of paper and allowing the painted surface to outgas overnight (or longer) between each round of sanding. Once the sanding was completed, the entire body was machine polished through two stages of compound (again allowing for overnight outgassing between rounds) to achieve a high luster. The final polishing stage was saved for after final assembly.
|
||
|
|
||
FINAL ASSEMBLY | ||
|
After the paint was colorsanded and buffed to a high gloss, it was time for final assembly. Since the client had opted to add most of the trim that came in the Ranger trim package, we were tasked with the job of mounting all those trim pieces without the aid of a template. Granted, the LMC catalog showed a drawing of the pieces with the truck to facilitate placing orders (shown at the end of the "Final Assembly" slideshow below), but we could find nothing spelling out exactly where all the parts go and - more importantly - just where to drill all the holes! Searching out photos online helped - to a point. The location of the side trim was fairly obvious, but not the location of the mounting holes. When it came to the rocker panel trim, it appeared as though there were as many mounting locations as there were examples to be seen online. And, the trim around the rear of the cab was particulary challenging because of the angled mounting pins of the corner pieces. When all was said and done - and after drilling a total of 177 holes in the freshly painted body and sqeezing off countless poprivets, the trim lined up very nicely and really set off the overall appearance.
All but 5 pieces of the trim ("F O R D" tailgate panel, windshield & rear glass trim, and the corners of the front hood trim) are new reproduction parts. The trim surrounding the windshield and rear window are not available as new reproductions, so those were sourced used (after months of searching) via eBay. The entire grill assembly and both chrome bumpers are new reproductions. The only chrome or stainless steel trim items that were reused from the original truck are the aformentioned corner pieces at the front of the hood, the "F" "O" "R" "D" letters at the front of the hood, the sideview mirror and door handles. One important note regarding the stainless steel trim pieces: Most all of the reproduction trim pieces are made overseas and the quality varies widely. So, don't expect the first shipment to be of acceptable quality - particluarly with regard to black-out paint trim and dents. Also, these pieces are made using a thinner gauge metal than the originals, so not only are they more susceptable to dents, they also are not held on as securely by the mounting devices provided. Be prepared to utilize some out-of-the-box thinking to ensure that everything stays securely mounted.
We discovered that - as with other vehicles of the era - the F-100 body was not truly symmetrical. The rear quarter panel sections of the bed - behind the rear wheels - are slightly different. In most cases, this would go entirely unnoticed. But, since we had to mount the new trim pieces where there were no mounting holes, we had to determine the proper locations. Surprisingly, the rocker panel trim pieces for those areas differed in length from one side to the other - as did the overall length of the wheel opening trim pieces. At first, we assumed that the differences were due to shoddy reproductions. But, when the left rear rocker panel trim was dropped down about 1/2" so that it would match up with the longer wheel opening trim (which extends further down in the back than does the one on the right side), it miraculously fit perfectly and extends rearwards to the same point as does the right side rocker panel trim. Viewed from each side, the rocker panel and wheel opening trim pieces look like they fit just as you would expect - even though the left side is actually mounted a bit lower than the right side. This is an example worth remembering when doing any restoration because other asymmetrical body examples are bound to exist in other vehicles built before computer-aided design and manufacturing - such as '67/'68 Mustang front fender lengths. The lesson to be learned: Don't force symmetry between sides of a vehicle's body unless/until you've verified that all trim pieces will fit.
Unfortunately, there doesn't seem to be a copy of a wiring diagram for a 1971 F-100 anywhere on the planet - or in cyberspace. Diagrams are available for preceeding and succeeding model years, but not 1971. Fortunately, little seems to have changed between 1970 and 1971, but there were some inconsistencies that provided a bit of a challenge. With some extra effort and after tracking down some wiring that led to switches that weren't on the truck when we got it and replacing some failed components that we weren't able to test before disassembly (one of the "gotchas" inherent in taking on a partially-disassembled project), we were able to get all of the electrical components and features operating - including the original AM radio.
After we finished assembling everything, we trailered it over to Performance Lube and Muffler in Princeton, TX where they fabricated a new 2 1/2" dual exhaust system utilizing Magnaflow mufflers.
|
||
|
|
||
COMPLETION | ||
|
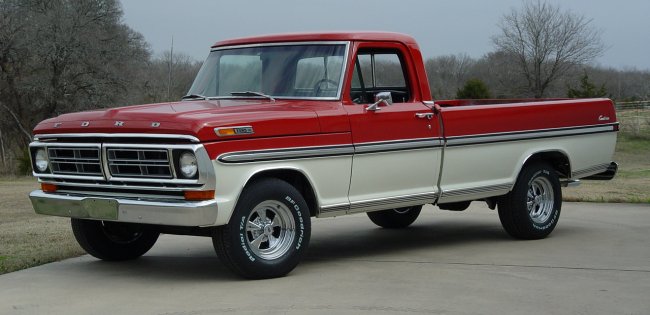
With reassembly completed, all that was left was to install a new set of Cragar Classic SS wheels (15" x 8") with BF Goodrich T/A radial tires (255/70 x 15), run through the pre-start checklist, start it up, break in the new camshaft and run it through some test drives. Aside from the coil failing just at the end of the 20-minute cam break-in, the engine ran great. With a new coil installed, we were able to ensure that all the necessary adjustments were performed before the first test drive. Running down the road, everything worked fine. All systems functioned normally and as you would expect given all that was done. The only notable exceptions were some excessive freeplay in the steering and unequal braking. Adjusting the brakes led to straight and consistent braking and adjustmet of the steering gearbox reduced the steering play to an acceptable level.
The end result is a very solid and presentable truck. While we were never asked to deliver a show-worthy restoration, with all the new trim, 5-footer paint job, fresh engine, detailed engine bay and new interior, it could very well drive away with a trophy from a local show. If nothing else, it's bound to confuse a few Ford truck enthusiast with all the Ranger trim on a truck that still retains its "Custom" trim-level badging.
|
||
|
|
| |
| Send Mail to |
| bob@midlifeclassics.com |
| |